前言
Spring Security中心功用, 认证和授权, 本章便是中心章节, 授权, 需求重视, 重视, 再重视
授权是什么?
首要究竟什么是授权, 通俗易懂版:
你有什么权限以支撑你去做哪些事, 操作哪些资源
认证和授权是怎么合作作业的?
小白: “前面咱们知道, 认证成功之后会将数据存储在
SecurityContextHolder上下文中, 那么这些用户信息怎么在授权阶段运用?”小黑: “在 Spring Security 中认证和授权是完全分开的联系, 不论你认证运用的是Basic Http认证仍是Disgest Http认证办法仍是依据表单的认证办法, 都不影响我后续的授权, 这一点你需求记住”
小白: “那你仍是没有提到要害点”
小黑: “嗯, 请看这儿”
public interface Authentication extends Principal, Serializable {
   Collection<? extends GrantedAuthority> getAuthorities();
}
小黑: “Spring Security环绕上面的
getAuthorities函数完结授权, 就这么简略, 你当然登录的用户有什么权限, 就看上面这个函数回来的调集有什么权限了”小白: “不对啊, 我人物呢? 现在大家不都是依据人物拜访操控(
Role-Based Access Control)么?”小黑: “是啊, 这个问题需求具体讨论”
是人物仍是权限?
在Spring Security的代码层面看, 人物和权限没有很大的差异, 只能说权限和人物在Spring Security层面都只不过是字符串罢了, 人物前面多了个ROLE_来差异是不是人物, 但这两都是字符串
小白: “等等, 问个问题, 人物和权限有什么差异?”
小黑: “人物你能够看做是权限的调集, 当然他两的联系是多对多联系, 差异仍是权限和人物的颗粒度不同, 权限你能够看做是原子, 而人物你能够看做是分子”
小白: “那么从
Authentication.getAuthorities函数拿出来的调集是人物仍是权限?”小黑: “
getAuthorities函数为什么不能一起回来人物和权限呢? 两个一起回来”小白: “啊? 那不乱么?”
小黑: “前面不是说了吗,在spring security中权限和人物,是同一个东西都是字符串啊, 只不过会给人物前面加上前缀以示差异罢了, 给你看张图”

小黑: “这是一张Spring Secuirty默许生成的表结构, 看看里边的内容, 包括人物和权限”
小黑: “该办法的回来值一般是这样的,比如说你要查询叫
zhazha这个用户的权限或许人物,那么它会回来这样一个调集'ROLE_ADMIN, readHello, writeHello', 这个函数便是这样用的。”
小白: “等等, 有些用户有多个人物,那你应该拿到哪一个人物的权限调集呢?仍是两个人物的权限调集全部拿到呢?”
小黑: “这个需求依据你体系的规划而决定,正常状况下呢,假如你在登录完结之后,有一个切换人物的按钮,那么在这样的一个体系中,你应该拿到单个人物的权限调集。假如你的体系没有切换人物这个按钮,那么应该回来一切人物的一切权限调集。”
小黑: “为了更好了解我,把两种模式的
user方针代码列出来。”
public class Users implements Serializable, UserDetails, CredentialsContainer {
    private Long id;
    private String username;
    private String password;
    private Boolean enabled = true;
    // 省掉一堆特点
    @Override
    public Collection<? extends GrantedAuthority> getAuthorities() {
        return null;
    }
}
小黑: “假如他是用户 <==> 权限 <==> 资源这种状况。”
private List<String> authorities;
@Override
public Collection<? extends GrantedAuthority> getAuthorities() {
    return AuthorityUtils.createAuthorityList(authorities.toArray(new String[0]));
}
小黑: “直接从数据库中查出一切的权限,然后在这个办法中直接回来就行了,就这么简略。”
小黑: “假如他是用户 <==> 人物 <==> 权限 <==> 资源这种状况”
// 这儿只代表当时人物, 人物能够有多种, 但是在我给的事例代码中需求用户手动切换人物
// private Role role;
// 这种表明拿出用户的一切人物
private List<Role> roles;
@Override
public Collection<? extends GrantedAuthority> getAuthorities() {
    if (CollUtil.isEmpty(roles)) {
        return Collections.emptyList();
    }
    // 增加人物名到 authorities 中
    final List authorities = new ArrayList<>(AuthorityUtils.createAuthorityList(roles.stream().map(Role::getAuthority).collect(Collectors.joining())));
    roles.forEach(role -> {
        if (CollUtil.isNotEmpty(role.getOperations())) {
           // 增加权限到 authorities 中
            authorities.addAll(AuthorityUtils.createAuthorityList(role.getOperations().stream().map(Operation::getAuthority).collect(Collectors.joining())));
        }
    });
    return authorities;
}
小白: “这样不是每次授权都要拜访一次数据库么? “
小黑: “你忘了么? 这儿是
User方针下面的getAuthorities函数, 而不是Authentication.getAuthorities函数, 而Authentication是缓存在session中的(当然有些状况缓存在redis中)”小黑: “
User方针的getAuthorities函数只会在下面代码履行一次, 之后就被缓存在session中了, 而授权并非运用的User方针, 而是Authentication方针下面的getAuthorities函数”

人物承继
Spring Security供给了用户人物权限承继功用, 比如你是班主任也是教师, 那么班主任能够承继教师人物的权限, 并供给归于班主任的权限
这儿仅仅举个比如, 不要杠精哦
小白: “等等, 你不是说 Spring Security没有人物么?”
小黑: “你中文肯定不合格, 我说的是Spring Security代码层面人物和权限没差异, 都是字符串罢了, 而非没有人物”
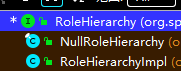
Spring Security中经过RoleHierarchy接口完结人物承继功用
public interface RoleHierarchy {
   Collection<? extends GrantedAuthority> getReachableGrantedAuthorities(
         Collection<? extends GrantedAuthority> authorities);
}
RoleHierarchy中只需一个getReachableGrantedAuthorities办法,该办法回来用户真实“可触达”的权限。
举个简略比如,假定用户界说了ROLE_ADMIN承继自 ROLE_USER,ROLE_USER承继自ROLE_GUEST,现在当时用户人物是ROLE_ADMIN,但是它实际可拜访的资源也包括ROLE_USER和ROLE_GUEST能拜访的资源.
getReachableGrantedAuthorities办法便是依据当时用户所具有的人物,从人物层级映射中解分出用户真实“可触达”的权限。
RoleHierarchy只需一个完结类RoleHierarchyImpl(还有一个没啥用的完结类),开发者一般经过RoleHierarchyImpl类来界说人物的层级联系,如下面代码表明:
@Test
void roleHierarchy() {
    RoleHierarchyImpl roleHierarchy = new RoleHierarchyImpl();
    roleHierarchy.setHierarchy("ROLE_ADMIN > ROLE_USER > ROLE_GUEST");
    System.err.println(roleHierarchy.getReachableGrantedAuthorities(List.of(new SimpleGrantedAuthority("ROLE_USER")))); // [ROLE_USER, ROLE_GUEST]
    System.err.println(roleHierarchy.getReachableGrantedAuthorities(List.of(new SimpleGrantedAuthority("ROLE_GUEST")))); // [ROLE_GUEST]
    System.err.println(roleHierarchy.getReachableGrantedAuthorities(List.of(new SimpleGrantedAuthority("ROLE_ADMIN")))); // [ROLE_USER, ROLE_GUEST, ROLE_ADMIN]
}
说白了, 便是一个分组方针
在项目中一般这么用?
@Configuration
public class RoleConfig {
   @Bean
   public RoleHierarchy roleHierarchy() {
      RoleHierarchyImpl roleHierarchy = new RoleHierarchyImpl();
      roleHierarchy.setHierarchy("ROLE_ADMIN > ROLE_USER > ROLE_GUEST");
      return roleHierarchy;
   }
}
我感觉也不是很方便的样子
源码剖析
这段源码剖析是有必要的, 晚上一堆装备办法, 但对于人物承继办法来说, 是有新旧办法之分的, 所以咱们需求事前声明, 咱们的版本是依据 Spring Boot 2.7.5
@Bean
public RoleHierarchy roleHierarchy() {
   RoleHierarchyImpl roleHierarchy = new RoleHierarchyImpl();
   roleHierarchy.setHierarchy("ROLE_ADMIN > ROLE_USER > ROLE_GUEST");
   return roleHierarchy;
}
咱们依据这段代码剖析源码
首要咱们进入的函数是这个:
public void setHierarchy(String roleHierarchyStringRepresentation) {
   // 保存 ROLE_ADMIN > ROLE_USER > ROLE_GUEST
   this.roleHierarchyStringRepresentation = roleHierarchyStringRepresentation;
   buildRolesReachableInOneStepMap();
   buildRolesReachableInOneOrMoreStepsMap();
}
然后分为这两个办法buildRolesReachableInOneStepMap buildRolesReachableInOneOrMoreStepsMap
buildRolesReachableInOneStepMap
private void buildRolesReachableInOneStepMap() {
   this.rolesReachableInOneStepMap = new HashMap<>();
   // 首要对字符串进行 \n 分组, 然后遍历, 咱们的代码少了 \n ROLE_ADMIN > ROLE_USER > ROLE_GUEST
   for (String line : this.roleHierarchyStringRepresentation.split("\n")) {
      // 对 ' > '(大括号前面有空格, 至少一个空格) 进行分组
      String[] roles = line.trim().split("\\s+>\\s+");
      // i = 1, 只对前面两个人物有处理
      for (int i = 1; i < roles.length; i++) {
         // 拿出第一个 ROLE_ADMIN 尽管 i = 1 但是拿的是第 0 个
         String higherRole = roles[i - 1];
         // 拿到下一个人物, ROLE_USER
         GrantedAuthority lowerRole = new SimpleGrantedAuthority(roles[i]);
         Set<GrantedAuthority> rolesReachableInOneStepSet;
         // 不包括 ROLE_ADMIN
         if (!this.rolesReachableInOneStepMap.containsKey(higherRole)) {
            rolesReachableInOneStepSet = new HashSet<>();
            // 以 ROLE_ADMIN 为 key, new 出 value
            this.rolesReachableInOneStepMap.put(higherRole, rolesReachableInOneStepSet);
         }
         else {
            rolesReachableInOneStepSet = this.rolesReachableInOneStepMap.get(higherRole);
         }
         // 将 ROLE_USER 增加到 ROLE_ADMIN 分组底下
         rolesReachableInOneStepSet.add(lowerRole);
      }
   }
}
上面的代码, 针对 ROLE_ADMIN 的分组, 增加了 ROLE_USER
然后在内部的那个 for 循环中, 对 ROLE_USER 创建了一个分组, 然后在 分组中增加 ROLE_GUEST
终究成果是
ROLE_ADMIN 分组只需 ROLE_USER 的权限
ROLE_USER 分组有 ROLE_GUEST权限
所以这么写, 终究的成果 原本 应该拥有 ROLE_USER 和 ROLE_GUEST 权限的 ROLE_ADMIN 只能有 ROLE_USER , 没有ROLE_GUEST的权限
假如咱们没看
roleHierarchy.getReachableGrantedAuthorities办法的话, 这肯定是不对的
这儿其实三种办法都行
@Test
public void test03() throws Exception {
   RoleHierarchyImpl roleHierarchy = new RoleHierarchyImpl();
   StrJoiner joiner = StrJoiner.of("\n").append("ROLE_ADMIN > ROLE_USER").append("ROLE_USER > ROLE_GUEST").append("ROLE_ADMIN > ROLE_GUEST");
   roleHierarchy.setHierarchy(joiner.toString());
   Collection<GrantedAuthority> authorityCollection = roleHierarchy.getReachableGrantedAuthorities(List.of(() -> "ROLE_ADMIN"));
   for (GrantedAuthority grantedAuthority : authorityCollection) {
      System.out.print(grantedAuthority.getAuthority() + "\t"); // ROLE_USER ROLE_GUEST ROLE_ADMIN
   }
}
@Test
public void test02() throws Exception {
   RoleHierarchyImpl roleHierarchy = new RoleHierarchyImpl();
   roleHierarchy.setHierarchy("ROLE_ADMIN > ROLE_USER > ROLE_GUEST");
   Collection<GrantedAuthority> authorityCollection = roleHierarchy.getReachableGrantedAuthorities(List.of(() -> "ROLE_ADMIN"));
   for (GrantedAuthority grantedAuthority : authorityCollection) {
      System.out.print(grantedAuthority.getAuthority() + "\t"); // ROLE_USER ROLE_GUEST ROLE_ADMIN
   }
}
@Test
void test01() throws Exception {
   RoleHierarchyImpl roleHierarchy = new RoleHierarchyImpl();
   StringJoiner stringJoiner = new StringJoiner("\n");
   stringJoiner.add("ROLE_ADMIN > ROLE_USER");
   stringJoiner.add("ROLE_USER > ROLE_GUEST");
   roleHierarchy.setHierarchy(stringJoiner.toString());
   Collection<GrantedAuthority> authorityCollection = roleHierarchy.getReachableGrantedAuthorities(List.of(() -> "ROLE_ADMIN"));
   for (GrantedAuthority grantedAuthority : authorityCollection) {
      System.out.print(grantedAuthority.getAuthority() + "\t"); // ROLE_USER ROLE_GUEST ROLE_ADMIN
   }
}
buildRolesReachableInOneOrMoreStepsMap
给可达的分组继续增加剩下的人物
咱们剖析源码的进程完全依照
"ROLE_ADMIN > ROLE_USER > ROLE_GUEST"剖析的
private void buildRolesReachableInOneOrMoreStepsMap() {
   this.rolesReachableInOneOrMoreStepsMap = new HashMap<>();
   // 迭代分组
   for (String roleName : this.rolesReachableInOneStepMap.keySet()) {
      // 拿出第一个分组下的成员列表
      Set<GrantedAuthority> rolesToVisitSet = new HashSet<>(this.rolesReachableInOneStepMap.get(roleName));
      //
      Set<GrantedAuthority> visitedRolesSet = new HashSet<>();
      while (!rolesToVisitSet.isEmpty()) {
         // 拿到成员的第一个人物名
         GrantedAuthority lowerRole = rolesToVisitSet.iterator().next();
         // 把拿到的分组删除去
         rolesToVisitSet.remove(lowerRole);
         // 将拿到的成员增加到 visitedRolesSet 调集中, 增加成功, 继续下一次循环
         // 中心代码在!this.rolesReachableInOneStepMap.containsKey(lowerRole.getAuthority())
         // 假如增加的 ROLE_ADMIN 组长的成员 ROLE_USER 在原先分组中也担任组长的话, 那意味着 ROLE_USER 组长底下的一切成员也是 ROLE_ADMIN 的成员
         // 因为 ROLE_ADMIN 也是 ROLE_USER 的成员
         // 所以下面的那个 !containsKey(不包括) 办法, 不履行
         if (!visitedRolesSet.add(lowerRole)
               || !this.rolesReachableInOneStepMap.containsKey(lowerRole.getAuthority())) {
            continue; // Already visited role or role with missing hierarchy
         }
         else if (roleName.equals(lowerRole.getAuthority())) {
            throw new CycleInRoleHierarchyException();
         }
        // 将查找到的一切可达成员, 增加到新的调集的分组中, 换句话说便是new了个新的分组, 在分组 ROLE_USER 下, 增加可达成员 ROLE_GUEST
         // 假如是 ROLE_ADMIN 分组组长, 那么就增加 ROLE_USER 和 ROLE_GUEST
         // !containsKey 不包括代码不履行 continue 之后, 就会将 ROLE_USER 底下的一切成员都给 ROLE_ADMIN
         // 往这个调集 rolesToVisitSet 增加另一个调集后, 上面的 !rolesToVisitSet.isEmpty() 条件也满意了, 继续增加 ROLE_USER 的成员
         rolesToVisitSet.addAll(this.rolesReachableInOneStepMap.get(lowerRole.getAuthority()));
      }
      // 将上面的成果visitedRolesSet 增加到 roleName 的分组中
      this.rolesReachableInOneOrMoreStepsMap.put(roleName, visitedRolesSet);
   }
}
终究增加的成果是这样:
至此分组完全完结
roleHierarchy.getReachableGrantedAuthorities
@Override
public Collection<GrantedAuthority> getReachableGrantedAuthorities(
      Collection<? extends GrantedAuthority> authorities) {
   if (authorities == null || authorities.isEmpty()) {
      return AuthorityUtils.NO_AUTHORITIES;
   }
   Set<GrantedAuthority> reachableRoles = new HashSet<>();
   // 从参数拿到的人物名被存入到下面的函数 ROLE_ADMIN
   Set<String> processedNames = new HashSet<>();
   for (GrantedAuthority authority : authorities) {
      // Do not process authorities without string representation
      if (authority.getAuthority() == null) {
         reachableRoles.add(authority);
         continue;
      }
      // processedNames.add("ROLE_ADMIN")
      if (!processedNames.add(authority.getAuthority())) {
         continue;
      }
      // Add original authority
      reachableRoles.add(authority);
      // 从这儿拿到可达调集, 依据数组 ROLE_ADMIN 拿到组长的成员 ROLE_USER 和 ROLE_GUEST
      Set<GrantedAuthority> lowerRoles = this.rolesReachableInOneOrMoreStepsMap.get(authority.getAuthority());
      if (lowerRoles == null) {
         continue; // No hierarchy for the role
      }
      for (GrantedAuthority role : lowerRoles) {
         // 增加现已增加了 (ROLE_ADMIN) , 现在准备增加 ROLE_USER 和 ROLE_GUEST
         if (processedNames.add(role.getAuthority())) {
            // 将方针也增加到可达列表中(ROLE_ADMIN, ROLE_USER 和 ROLE_GUEST)
            reachableRoles.add(role);
         }
      }
   }
   return new ArrayList<>(reachableRoles);
}
终究成果:

成果回来到这样了:
至此源码剖析完结
总结下:
整个进程, 像是凭借咱们的表达式, 解分出咱们写入的字符串的表达式, 寄存在 Map<String, Set<GrantedAuthority>> rolesReachableInOneStepMap方针
但该调集中的内容是不完整的, rolesReachableInOneStepMap调集只能寄存一级人物联系, 比如你是 admin , 那么该调集只能寄存到 user 这个等级, 不能寄存 guest 这个等级
接着便是查找可达人物, 寄存在这个调集中Map<String, Set<GrantedAuthority>> rolesReachableInOneOrMoreStepsMap
可达查找的要害在于 !this.rolesReachableInOneStepMap.containsKey(lowerRole.getAuthority())判别. 假如该回来为 true, 则直接 continue, 回来 false 的话直接到this.rolesReachableInOneOrMoreStepsMap.put(roleName, visitedRolesSet);
上面的整个进程也十分简略, 假如
ROLE_ADMIN的成员有一个ROLE_USER, 然后在rolesReachableInOneStepMap分组中判别下ROLE_USER是否为组长, 假如是组长, 则意味着ROLE_ADMIN是ROLE_USER的组长, 所以ROLE_USER的成员都是ROLE_ADMIN的
小白: “有问题, 看人物承继的源码”
public Collection<GrantedAuthority> getReachableGrantedAuthorities(
      Collection<? extends GrantedAuthority> authorities)
小白: “看这个函数里边不是回来了人物和权限吗?但是这个函数其实他只需人物就行了,这样把权限传进去不会有问题吗?”
小黑: “没有任何的影响”
public class RoleHierarchyVoter extends RoleVoter {
   private RoleHierarchy roleHierarchy = null;
   public RoleHierarchyVoter(RoleHierarchy roleHierarchy) {
      Assert.notNull(roleHierarchy, "RoleHierarchy must not be null");
      this.roleHierarchy = roleHierarchy;
   }
   @Override
   Collection<? extends GrantedAuthority> extractAuthorities(Authentication authentication) {
      return this.roleHierarchy.getReachableGrantedAuthorities(authentication.getAuthorities());
   }
}
小黑: “看看上面的代码,然后我再写下面这个测试案例。”
@Test
public void test04() throws Exception {
   RoleHierarchyImpl roleHierarchy = new RoleHierarchyImpl();
   roleHierarchy.setHierarchy("ROLE_ADMIN > ROLE_USER > ROLE_GUEST");
   Collection<GrantedAuthority> authorities = roleHierarchy.getReachableGrantedAuthorities(AuthorityUtils.createAuthorityList("ROLE_ADMIN", "readHello", "writeHello"));
   for (GrantedAuthority grantedAuthority : authorities) {
      log.error(grantedAuthority.getAuthority() + "\t"); // ROLE_USER    ROLE_GUEST writeHello ROLE_ADMIN readHello
   }
}
小黑: “下面注释的地方便是本次测试案例的履行成果。所以不论传递人物仍是权限,都不会影响到人物承继的成果呈现。”
记住, 在以sql合作的动态权限计划中, 人物的承继将会失效, 因为你只需求在数据库中修正对应人物的权限就能够修正权限了, 不过这也是后续的工作, 后边会具体介绍
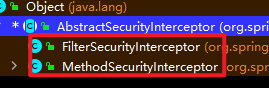
授权的办法
授权的办法有两种
- 依据过滤器(URL)
FilterSecurityInterceptor - 依据AOP(办法)
MethodSecurityInterceptor

小白: “只需这两种?”
小黑: “是的, 就这两种, 依据颗粒度不同处理不同的资源”
授权进程源码剖析
这儿的源码剖析我将会分为两种,也便是上面的两种不同的颗粒度: 依据URL和依据办法。
首要咱们会依据URL进行源码剖析,然后再依据办法剖析。
首要咱们需求确定授权进程的中心接口都有哪一些。
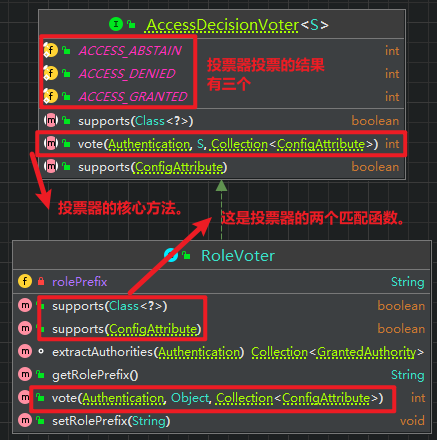
在这儿有一个中心的特点需求重视一下。
这个特点便是一个调集,这跟前面认证是差不多的,认证进程中Manager也是一个调集, 而Provider是调集元素。
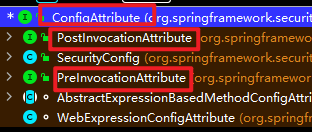
从这个特点咱们能够看到一个接口,这个便是投票器接口。
 这儿看这个也十分简略,是吧?
现在便是第3个中心接口。
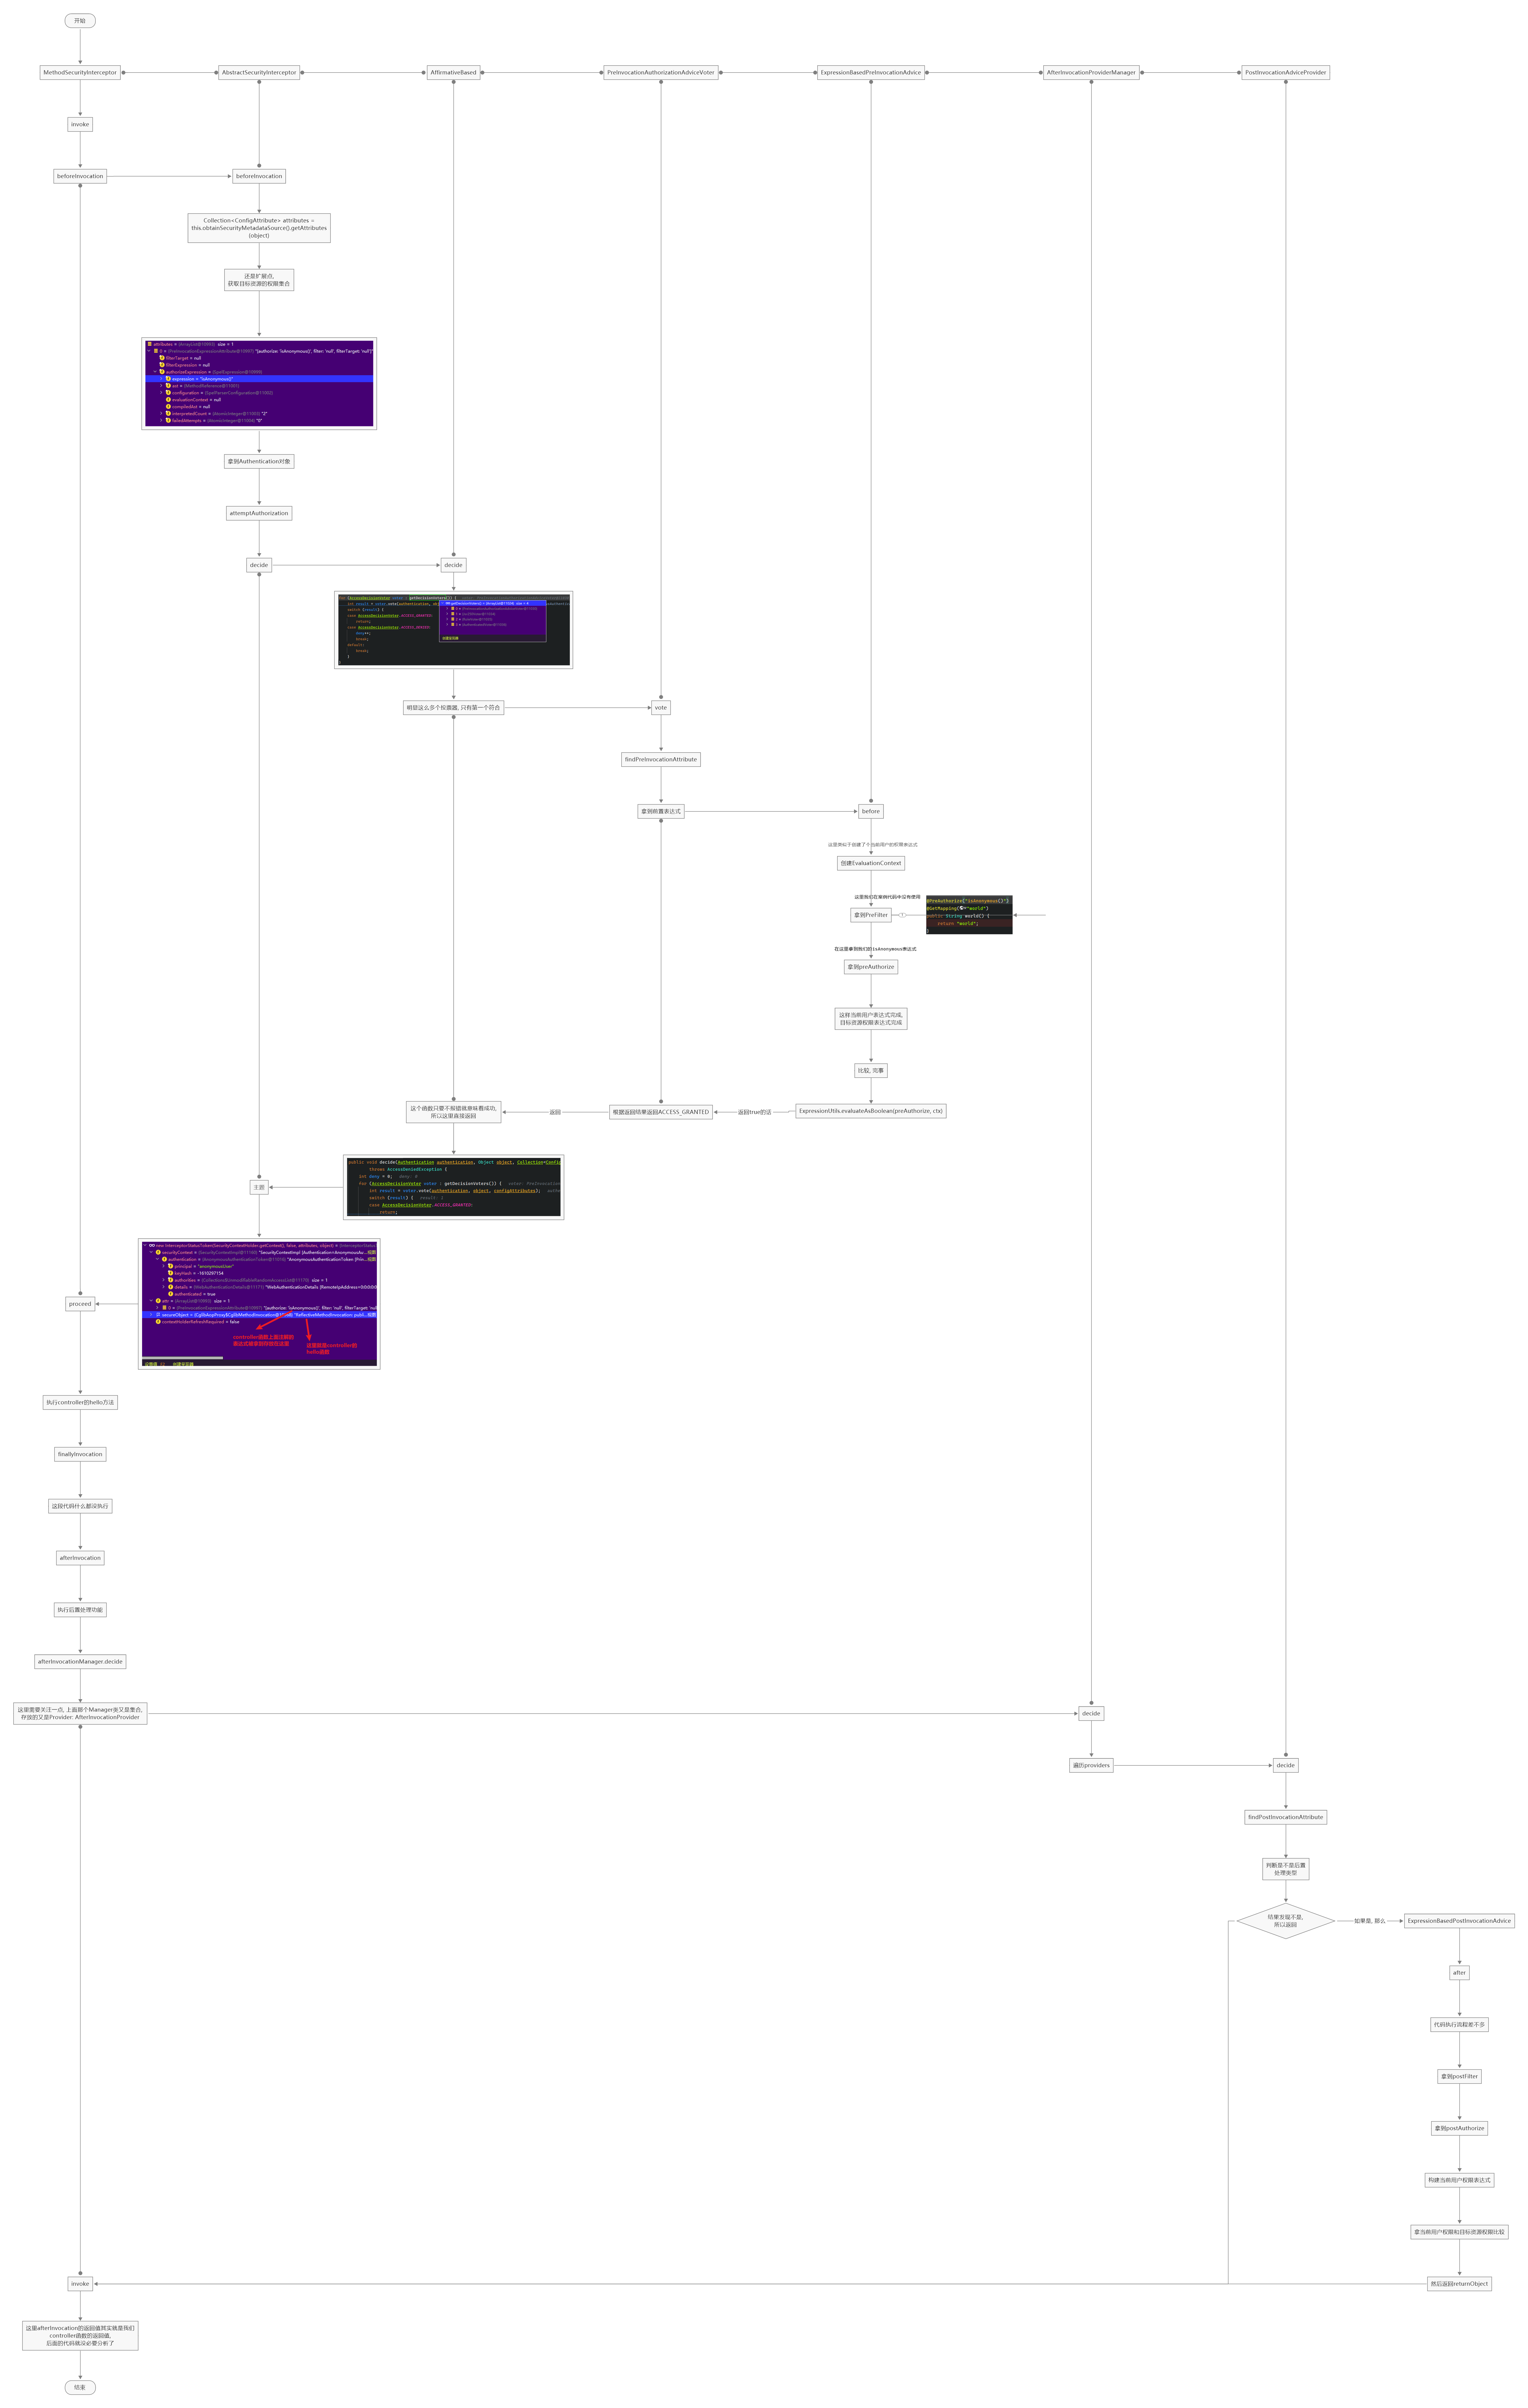
public interface ConfigAttribute extends Serializable {
   String getAttribute();
}
这儿面寄存的都是权限或许是权限所需求的表达式。
源码剖析思路
现在看这三个中心接口你大概也就知道他怎么玩了,说白了便是一个manager调集,然后遍历这个调集,里边调集的元素是投票器,每一个投票器都有一个投票办法和匹配办法,匹配办法经过匹配ConfigAttribute, 来判别运用哪一个投票器
接着投票器调用投票办法,在投票办法中遍历当时用户的权限和方针资源的权限看看当时用户的权限是否满意拜访资源的权限。依据遍历的成果,是否匹配回来三种不同的成果,
- 第1种是答应拜访
- 第2种是放弃
- 第3种是拒绝
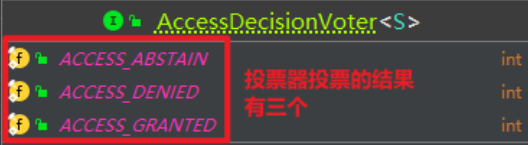
对应着接口的三个常量
紧接着咱们就能够依据咱们所剖分出来的思路进行源码盯梢。
剖析源码一定要带着目的去, 不然剖析不出什么东西的
源码剖析
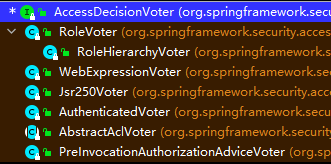
第1步从根源开端。便是匹配究竟是URL仍是办法?
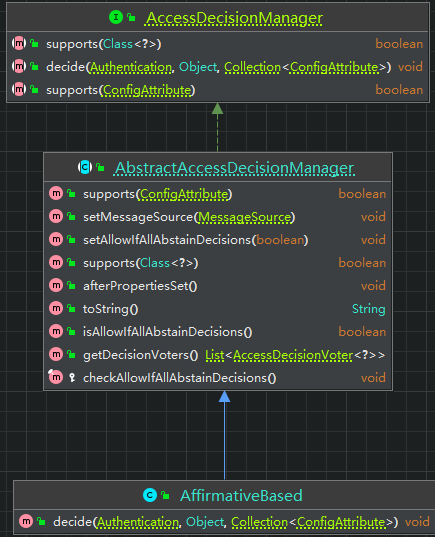
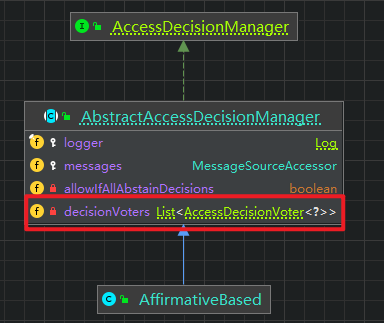
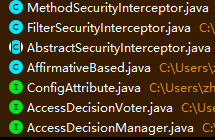
AbstractSecurityInterceptor
此次源码剖析大致涉及这几个类
从URL开端剖析
FilterSecurityInterceptor

这个类其实很眼熟。
在spring security的过滤器列表中的倒二仍是倒三就有一个,上面这个类。

能够发现这儿有三个中心办法, 依据这三个办法能够看到整个源码剖析的进程
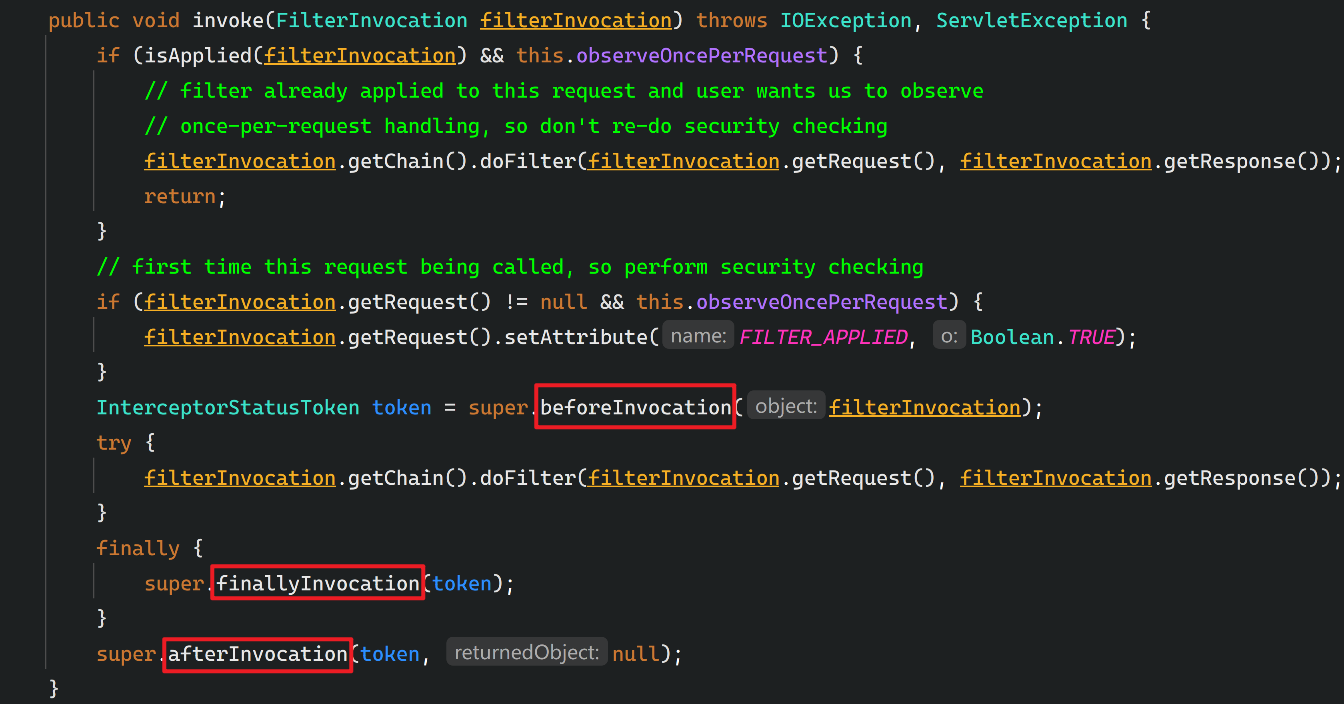
AbstractSecurityInterceptor#beforeInvocation
protected InterceptorStatusToken beforeInvocation(Object object) {
Assert.notNull(object, "Object was null");
if (!getSecureObjectClass().isAssignableFrom(object.getClass())) {
throw new IllegalArgumentException("Security invocation attempted for object " + object.getClass().getName()
+ " but AbstractSecurityInterceptor only configured to support secure objects of type: "
+ getSecureObjectClass());
}
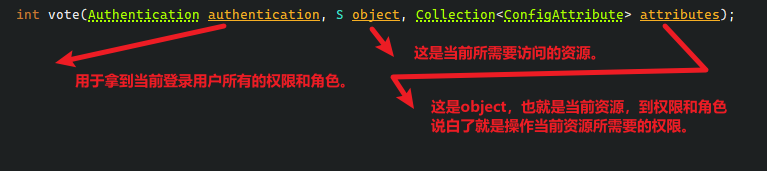
// 获取资源(也便是object)所需的权限(和人物)
Collection<ConfigAttribute> attributes = this.obtainSecurityMetadataSource().getAttributes(object);
// 资源没有对应的权限, 直接回来 null
if (CollectionUtils.isEmpty(attributes)) {
publishEvent(new PublicInvocationEvent(object));
return null; // no further work post-invocation
}
// 没有认证信息, 直接抛出反常
if (SecurityContextHolder.getContext().getAuthentication() == null) {
credentialsNotFound(this.messages.getMessage("AbstractSecurityInterceptor.authenticationNotFound",
"An Authentication object was not found in the SecurityContext"), object, attributes);
}
// 从SecurityContextHolder中拿到Authentication
Authentication authenticated = authenticateIfRequired();
// 准备调用决议计划器, 后边办法不必剖析了
attemptAuthorization(object, attributes, authenticated);
if (this.logger.isDebugEnabled()) {
this.logger.debug(LogMessage.format("Authorized %s with attributes %s", object, attributes));
}
if (this.publishAuthorizationSuccess) {
publishEvent(new AuthorizedEvent(object, attributes, authenticated));
}
// Attempt to run as a different user
Authentication runAs = this.runAsManager.buildRunAs(authenticated, object, attributes);
if (runAs != null) {
SecurityContext origCtx = SecurityContextHolder.getContext();
SecurityContext newCtx = SecurityContextHolder.createEmptyContext();
newCtx.setAuthentication(runAs);
SecurityContextHolder.setContext(newCtx);
if (this.logger.isDebugEnabled()) {
this.logger.debug(LogMessage.format("Switched to RunAs authentication %s", runAs));
}
// need to revert to token.Authenticated post-invocation
return new InterceptorStatusToken(origCtx, true, attributes, object);
}
this.logger.trace("Did not switch RunAs authentication since RunAsManager returned null");
// 回来成果, 但由于是依据过滤器的办法, 不需求处理后续的两个函数
// 所以这儿回来之后的函数就不需求剖析了, 首要剖析上面的attemptAuthorization函数
return new InterceptorStatusToken(SecurityContextHolder.getContext(), false, attributes, object);
}
private void attemptAuthorization(Object object, Collection<ConfigAttribute> attributes,
      Authentication authenticated) {
   try {
      this.accessDecisionManager.decide(authenticated, object, attributes);
   }
    // 省掉一堆代码
}
// AffirmativeBased
public void decide(Authentication authentication, Object object, Collection<ConfigAttribute> configAttributes)
      throws AccessDeniedException {
   int deny = 0;
    // 调集遍历投票器
   for (AccessDecisionVoter voter : getDecisionVoters()) {
       // 投票, 产生成果
      int result = voter.vote(authentication, object, configAttributes);
      switch (result) {
      case AccessDecisionVoter.ACCESS_GRANTED:
         return;
      case AccessDecisionVoter.ACCESS_DENIED:
         deny++;
         break;
      default:
         break;
      }
   }
    // 假如没事还好根本上投票经过了, 不然会抛出AccessDeniedException反常
   if (deny > 0) {
      throw new AccessDeniedException(
            this.messages.getMessage("AbstractAccessDecisionManager.accessDenied", "Access is denied"));
   }
   // To get this far, every AccessDecisionVoter abstained
   checkAllowIfAllAbstainDecisions();
}
接下来便是给猪都能编写的代码了
// RoleVoter
@Override
public int vote(Authentication authentication, Object object, Collection<ConfigAttribute> attributes) {
   if (authentication == null) {
      return ACCESS_DENIED;
   }
   int result = ACCESS_ABSTAIN;
   Collection<? extends GrantedAuthority> authorities = extractAuthorities(authentication);
   for (ConfigAttribute attribute : attributes) {
      if (this.supports(attribute)) {
         result = ACCESS_DENIED;
         for (GrantedAuthority authority : authorities) {
            if (attribute.getAttribute().equals(authority.getAuthority())) {
               return ACCESS_GRANTED;
            }
         }
      }
   }
   return result;
}
像不像在调集 [1, 2, 3] 和 [3] 中遍历是否有相同的元素代码?
只不过前者是资源所需权限数组, 后者是当时用户一切的权限数组
来, 给个绝杀流程图
流程图或许有错, 但大体上没什么问题
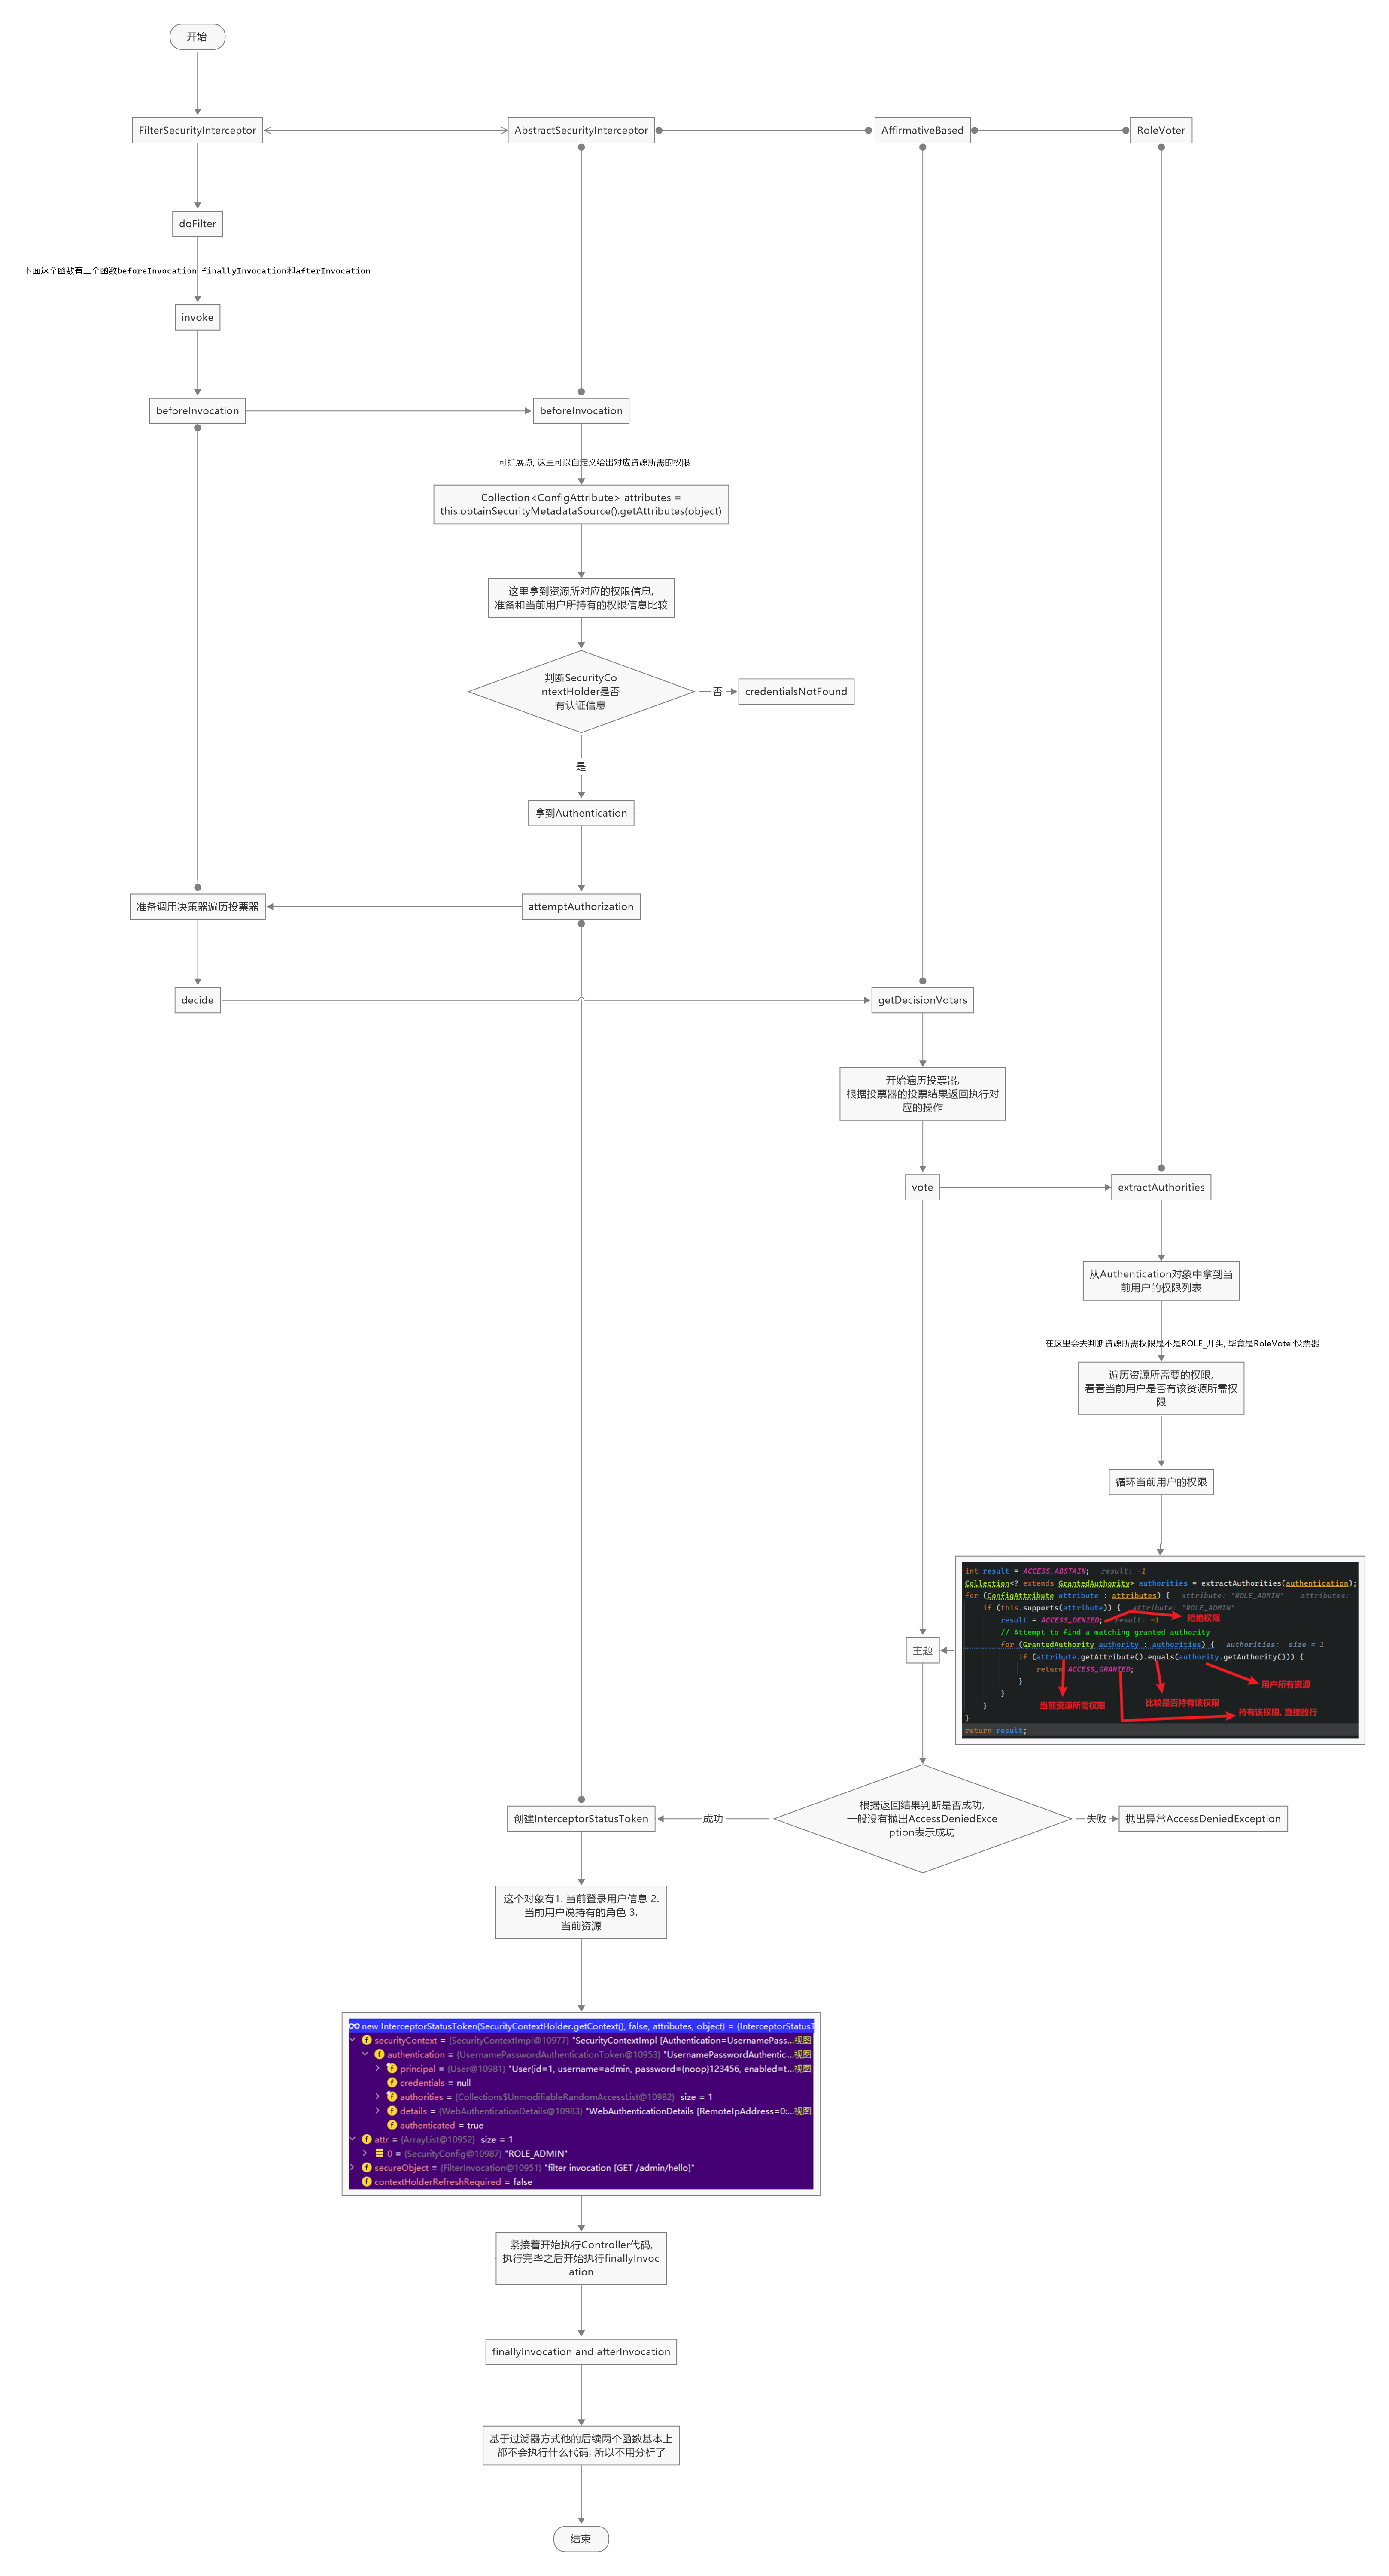
至此依据URL过滤器办法的源码剖析根本结束
对了, 源码剖析进程在这个项目中进行的
dynamic-permission-demo
数据库表结构也在那里边
从AOP(办法)办法开端剖析
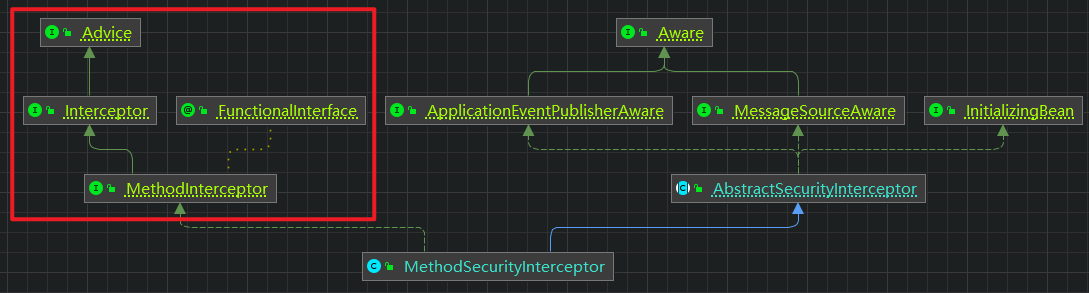
能够看出是依据Spring AOP完结的阻拦功用
阻拦后直接断在这儿

仍是熟悉的三个函数
这儿我就直接给出流程图吧, 源码给出的太多, 看我写的注释也很累, 直接看流程图快些
根本剖析源代码和URL差不多, 只不过在处理权限时存在不同之处, 还有那三个函数的终究一个函数afterInvocation在 AOP 办法中仍是有用途的
首要目的便是处理后置注解, 比如 @PostAuthorize @PostFilter
办法也十分简略, 依据一个条件, 判别是否是后置处理注解, 然后看 AfterInvocationManager 和 AfterInvocationProvider 这两接口
Manager是调集, Provider是调集的元素, 中心办法仍是 decide , 只不过 Provider 多了个 findPostInvocationAttribute 函数
该函数的功用也十分简略, 判别前置仍是后置注解
private PostInvocationAttribute findPostInvocationAttribute(Collection<ConfigAttribute> config) {
   for (ConfigAttribute attribute : config) {
      if (attribute instanceof PostInvocationAttribute) {
         return (PostInvocationAttribute) attribute;
      }
   }
   return null;
}
对应着还有一个检测是否是前置注解的函数, 不过不在 Provider 中了
在 PreInvocationAuthorizationAdviceVoter 类中, 看类名能够判别出来是处理前置注解的
不论是不是后置注解, 都会履行一次
PreInvocationAuthorizationAdviceVoter, 只不过在该类的findPostInvocationAttribute函数中判别出来不是前置注解才停下来的
private PreInvocationAttribute findPreInvocationAttribute(Collection<ConfigAttribute> config) {
   for (ConfigAttribute attribute : config) {
      if (attribute instanceof PreInvocationAttribute) {
         return (PreInvocationAttribute) attribute;
      }
   }
   return null;
}
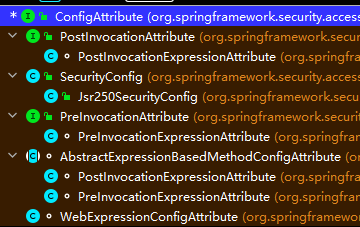
这两接口都承继至ConfigAttribute
我前面说的 findPreInvocationAttribute 判别是的前置注解仍是后置注解是不对的, 这儿判别的其实是权限类型, 究竟是前置仍是后置
更多的源码看流程图吧, 打字好累
对了终究再给出投票器的类族介绍吧
-
RoleVoter:RoleVoter是依据登录主体的人物进行投票,即判别当时用户是否具备受维护方针所需求的人物。需求留意的是,默许状况下人物需以“ROLE_”开端,不然supports办法直接回来false,不进行后续的投票操作。 -
RoleHierarchyVoter:RoleHierarchyVoter承继自RoleVoter,投票逻辑和RoleVoter一致,不同的是RoleHierarchyVoter支撑人物的承继,它经过RoleHierarchylmpl方针对用户所具有的人物进行解析,获取用户真实“可触达”的人物;而RoleVoter则直接调用authentication.getAuthorities()办法获取用户的人物。 -
WebExpressionVoter:依据URL地址进行权限操控时的投票器(支撑SpEL)。 -
Jsr250Voter:处理JSR-250权限注解的投票器,如@PermitAll、@DenyAll等。 -
AuthenticatedVoter:AuthenticatedVoter用于判别当时用户的认证办法,它有三种取值:IS_AUTHENTICATED_FULLY、IS_AUTHENTICATED_REMEMBERED以及IS_AUTHENTICATED_ANONYMOUSLY。其间:IS_AUTHENTICATED_FULLY要求当时用户既不是匿名用户也不是经过RememberMe进行认证 ;IS_AUTHENTICATED_REMEMBERED则在前者的基础上,答应用户经过RememberMe进行认证;IS_AUTHENTICATED_ANONYMOUSLY则答应当时用户经过RememberMe认证,也答应当时用户是匿名用户。 -
AbstractAclVoter:依据ACL进行权限操控时的投票器。这是一个抽象类,没有绑定到具体的ACL体系(关于ACL,后边会做具体介绍))。 -
AclEntryVoter:AcIEntryVoter承继自AbstractAclVoter,依据Spring Security供给的ACL权限体系的投票器。 -
PreInvocationAuthorizationAdviceVoter: 处理@PreFilter和@PreAuthorize注解的投票器。
投票成果并非终究成果(经过或拒绝),终究成果还要看决议计划器(
AccessDecisionManager)。
剖析完源码咱们能够发现有个扩展点, 该扩展点是 SecurityMetadataSource 类

咱们知道, 方针资源的权限除了在 Spring Security上装备外, 还能够经过动态权限办法在数据库中装备, 所以上面这个办法显着需求修正, 修正成从数据库获取权限列表
不然将无法从数据库中抓取方针资源的权限调集
不过本篇字数现已 6000了, 太多字各位读者看着也累, 我手也写的好酸, 放在下一篇吧
总结
对了终究再着重一遍, 人物承继和动态权限有抵触, 假如咱们的权限 人物 用户 都从数据库读取的话, 那么人物承继将会失效, 这点需求留意, 都能从数据库中修正了, 何必还搞什么人物承继
紧接着便是 授权的办法, 一个是 依据过滤器, 另一个是依据 AOP 完结, 说白了, 一个是 URL 粗颗粒度, 另一个是办法, 细颗粒度
在 Spring Security中 人物和权限只不过是字符串, 一部分朋友给出的主张是 Authentiation.getAuthorities函数(换句话说便是咱们自界说的 User类的 getAuthorities 函数)回来权限, 而我给出的主张是回来人物和权限
小白: “对了, 还有个问题, 那便是假如你的体系有人物, 那么你要怎么规划表结构呢? 让Spring Secuiry多出关于人物表的操作?”
小黑: “其实只需求在
mybatis和 自界说的User类 中操作就好, 至于你说的人物表, 就更简略了, 能够直接看我的sql模板, 至于人物方针, 看下面代码”
@Data
public class Role implements GrantedAuthority {
   // 这是人物名
   private String name;
   // 这是权限, 多个权限
   private List<SimpleGrantedAuthority> allowedOperations = new ArrayList<>();
   // 获得人物名
   @Override
   public String getAuthority() {
      return this.name;
   }
}
授权进程也十分简略, 首要中心便是拿到当时用户所持有的权限和方针资源的权限 做遍历匹配完事, 还记得那个一头猪都能写出的两个 for 循环么? 底层便是这么的直接, 然后依据是否匹配而产生三种状况, 依据这三种状况在决议计划器中履行只需保证不抛出反常就表明成功, 意味着当时用户有权限拜访该资源, 假如抛出反常, 表明当时用户没有权限拜访该资源
待续